Whitebox Strategy Engine » Position Exit Settings
One of the most customisable aspects of the strategy scripts are the Position Exit Settings.
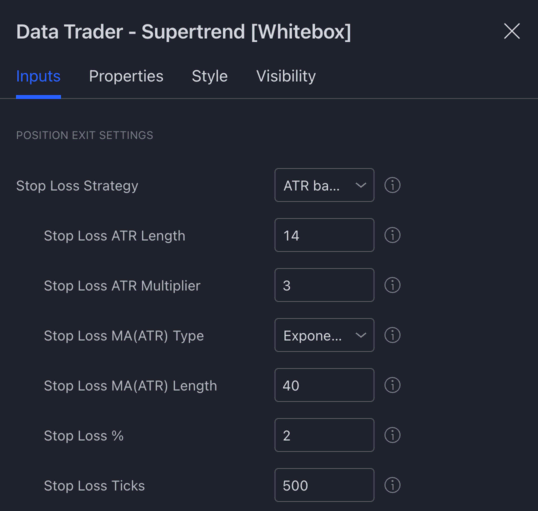
In this section you can configure the stop loss and take profit strategies, the trailing stop loss, and various other things related to how positions are exited.
Let's review each of these one by one.
Stop Loss Strategy
By configuring a "Stop Loss Strategy" you can tell the script how to calculate the stop loss for each position it opens.
You can choose from the following strategies:
- ATR based: The stop loss will be set to X times the ATR above/below the entry signal candle's closing price.
- MA(ATR) based: The stop loss will be set to X times the MA smoothed ATR above/below the entry signal candle's closing price.
- % based: The stop loss will be set to X percent above/below the entry signal candle's closing price.
- Tick based: The stop loss will be set to X ticks above/below the entry signal candle's closing price.
- Wick based: The stop loss will be set to the high / low of the entry signal candle. Whether it is at the high or the low of the candle, it depends on the direction of the trade.
- Reward multiplier: The stop loss will be set to X times the reward. This strategy cannot be used in combination with the risk multiplier based take profit strategy.
- Disabled: The strategy will not use a stop loss.
The strategies listed above are available in every strategy script. Some of the scripts have other, script specific stop loss strategies. These custom strategies are documented under the dedicated help page of each strategy script.
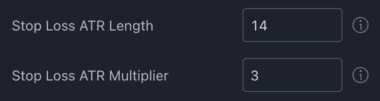
ATR based
When using the ATR based stop loss strategy, the stop loss will be placed X times the ATR above or below the entry price. The ATR itself can be configured via the Stop Loss ATR Length and Stop Loss ATR Multiplier inputs:
Here is an example trade and its ATR based stop loss using the settings above:
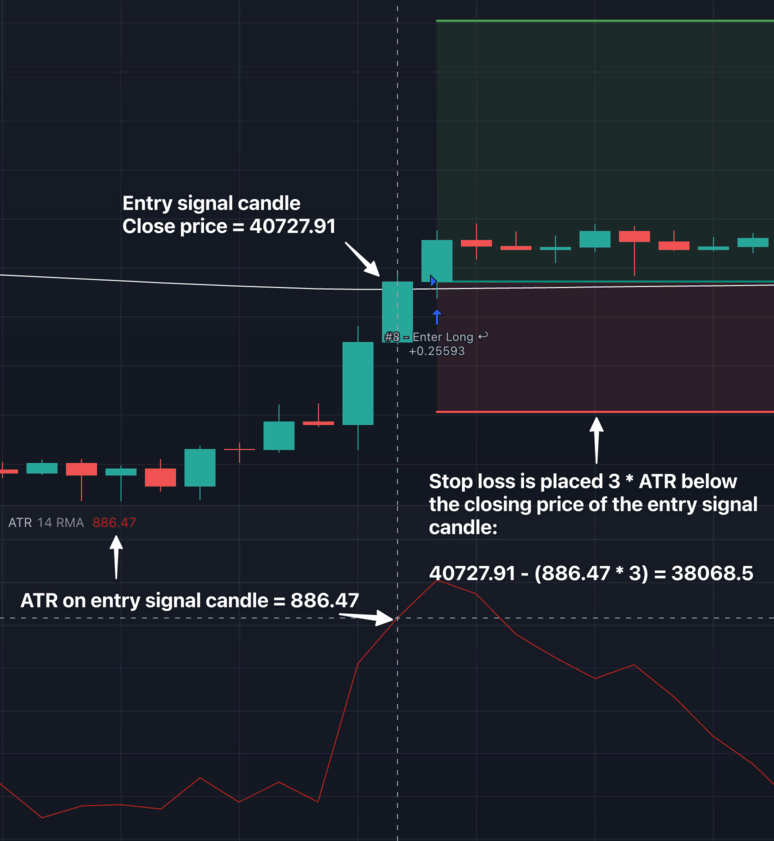
Please note that the ATR value on the screenshot is displayed using a separate ATR indicator. If you want to add an ATR indicator to your chart, search for the Average True Range indicator.
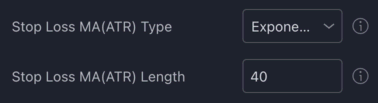
MA(ATR) based
The MA(ATR) based stop loss strategy is very similar to the ATR based, the only difference is that the ATR value itself is smoothed using a moving average.
The type and length of the moving average to be used for smoothing the ATR can be configured via the Stop Loss MA(ATR) Type and Stop Loss MA(ATR) Length inputs:
The ATR itself can be configured via the ATR inputs, as described above.
% based
The percentage based stop loss strategy is as simple as it sounds. Each trade's stop loss will be placed X percent below or above the entry signal candle's closing price.
The % can be configured via the Stop Loss % input:

Tick based
The tick based stop loss strategy will place the stop loss X ticks above or below the entry signal candle's closing price. The number of ticks to use can be configured via the Stop Loss Ticks input:

Each market has its own specific tick value associated with it. For example on the BTCUSDT 1 tick is equal to 0.01 USDT.
Using a Stop Loss Ticks value of 500, will have each trade's stop loss placed 500 * 0.01 = 5 USDT below (for longs) or above (for shorts) the entry price.
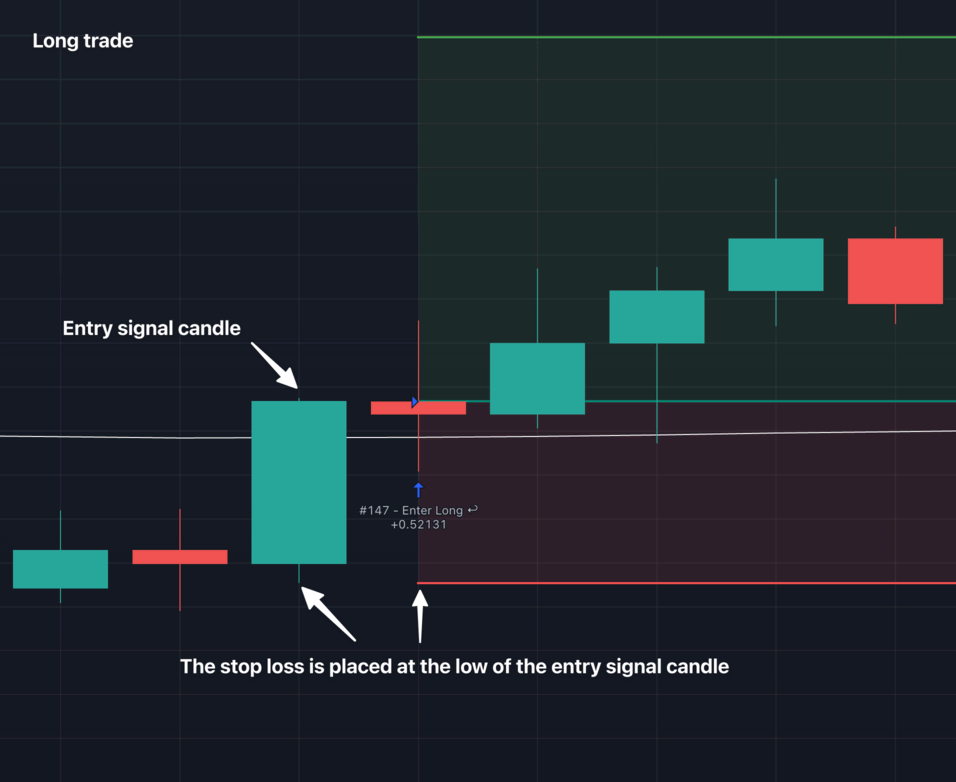
Wick based
The wick based stop loss strategy will set the stop loss to the high (for shorts) or low (for longs) of the entry signal candle.
Here is a long entry example that uses the wick based strategy:
For short trades the stop loss will be placed at the high of entry signal candle.
By default it is always the entry signal candle's wick that is being used for determining the stop loss, however this can be changed. If you want to use a previous candle's wick, just set a candle offset via the Stop Loss Wick Candle Offset:

- Offset 0: entry signal candle
- Offset 1: 1 candle before the entry signal candle
- Offset 2: 2 candles before the entry signal candle
- etc.
Besides setting a candle offset, you can also set a price offset via the Stop Loss Wick Price Offset input. For example, setting an offset of 2% will result in the stop loss being placed 2% above the high or below the low of the entry signal candle.
Reward multiplier
The reward multiplier stop loss strategy will place the stop loss X times the reward, in other words the distance between the entry price and the take profit.
The multiplier can be set via the Stop Loss Reward Multiplier input:

A reward multiplier of 1, will have the stop loss placed at the exact same distance as the take profit, resulting in a 1:1 Risk/Reward ratio.
A reward multiplier of 0.5, will have the stop loss placed half the distance of the take profit, resulting in a 1:2 Risk/Reward ratio.
Etc.
Note: The Reward multiplier stop loss strategy cannot be used in combination with the Risk multiplier take profit strategy. This is because it would introduce a "circular dependency" between the take profit and stop loss calculations. In order to calculate the stop loss, the take profit has to be calculated first. Likewise, in order to calculate the take profit, the stop loss would have to be calculated first.
Disabled
Finally, if you have the stop loss strategy set to disabled, no stop loss will be used for any of the trades.
If no stop loss is being used, how do trades get exited then?
- Take profit is hit
- "Close position early..." condition becomes active (see below)
Secondary Stop Loss Strategy
By configuring a secondary stop loss strategy, you have the option to override the primary stop loss if it meets a specific criteria.
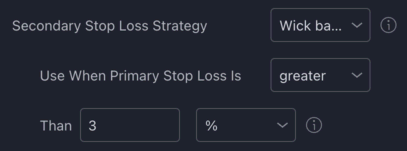
For example, assume you use an ATR based strategy with a multiplier set to 3 as your primary stop loss strategy. Most of the time the stop loss will be placed relatively close to the entry price. However, there will be times, when the ATR based stop loss is placed too far from the entry price. In this case, you may want to opt to use a Wick based stop loss strategy instead. To do this, set the secondary stop loss strategy to Wick based, and configure the criteria when the secondary strategy should take over. Whenever the activation criteria is true, the secondary stop loss strategy will take over for that particular trade.
The parameters for the secondary stop loss strategy (e.g. how many ticks to use) can be set in the primary stop loss section above.
Minimum Stop Loss %
You can use this as a safety net to prevent stop losses being placed too close to the entry price. Setting this to 2 for example would result in the strategy never placing the stop loss closer than 2% to the entry price. This setting applies to both the primary and secondary stop loss strategies.

Maximum Stop Loss %
You can use this as a safety net to prevent stop losses being placed way too far away from the entry price. Setting this to 10 for example would result in the strategy never placing the stop loss further than 10% away from the entry price. This setting applies to both the primary and secondary stop loss strategies.

Dynamic Stop Loss
The primary and secondary stop loss strategies we discussed above is about setting a "static" stop loss; a stop loss that never moves once placed.
But what if you wanted the stop loss to automatically trail the price? Or to move the stop loss to break even once the price reaches a certain level?
This is what the Dynamic Stop Loss functionality is about. By ticking the "Enable Dynamic Stop Loss" checkbox, you tell the strategy to alter the stop loss as the price is moving in your favour.

How the stop loss is moved all depends on the settings you configure under the Dynamic Stop Loss section.
Let's review these options one by one.
Mode

The Mode dropdown let's you choose the "mechanism" of the dynamic stop loss.
You have 3 modes to choose from:
Move: The stop loss will be moved once to the specified level when your configured trigger price is reached. The stop loss is only moved once per trade.Trail: The stop loss will be trailing the price. During backtesting the stop loss is only moved at most once at the close of the candle. During forward testing the stop loss is being updated with every tick. The stop loss can be moved any number of times throughout a trade.Move & Trail: The stop loss will be changed by both the "moving" and the "trailing" mechanisms.
Let's go through each of these modes in detail.
Mode: Move
The Move mechanism is the simplest of all. Once the price reaches a certain level, it moves the stop loss to a cetain price level.
First, let's take a look at the settings that are relevant to the Move mechanism:
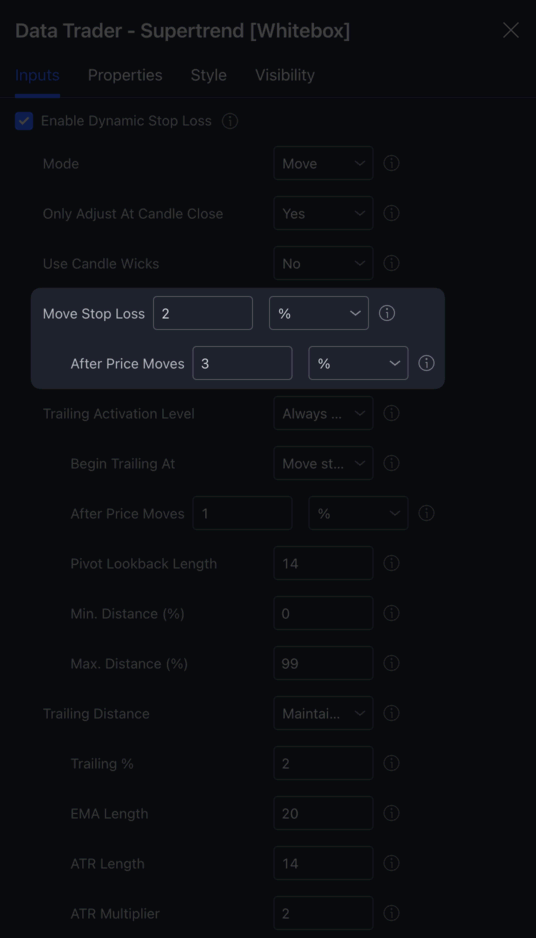
As you can see from the screenshot above, only the two highlighted input boxes are used for configuring the Move mechanism. (OK, this is not entirely true as you will learn from the example below. The other inputs that are relevant will be explained below).
Move Stop Loss X [% / Ticks / Risk Multiplier]

These two input boxes allow you to configure the price level to move the stop loss to.
Using the settings in the image above the stop loss will be moved 2% towards the entry price once a certain "trigger" price is hit.
Besides a %, you can also use Ticks or Risk Multiplier. For example, if you use 1 Risk Multiplier, the stop loss will be moved 1 times the risk (the difference between the entry price and the stop loss) towards the entry price. In other words, the stop loss will be moved to break even.
But how to configure this "trigger" price? Via the After Price Moves input boxes.
After Price Moves X [% / Ticks / Risk Multiplier]
To configure the level the price has to hit for the stop loss to be moved, you can change the values in the After Price Moves input boxes.

In the image above we have After Price Moves set to 3 %. This means, that whenever price moves 3% in our favour (i.e. towards the take profit), the Move mechanism will kick into action, and will move the stop loss to the specified price level (2% above or below the entry price, depending on the direction of the trade).
Alright, that's probably enough theory! Let's see how it all works on the chart.
Move mechanism example
Using the same settings as above:
- Move Stop Loss 2%
- After Price Moves 3%
Here is an example long trade taken on the BTCUSDT chart:
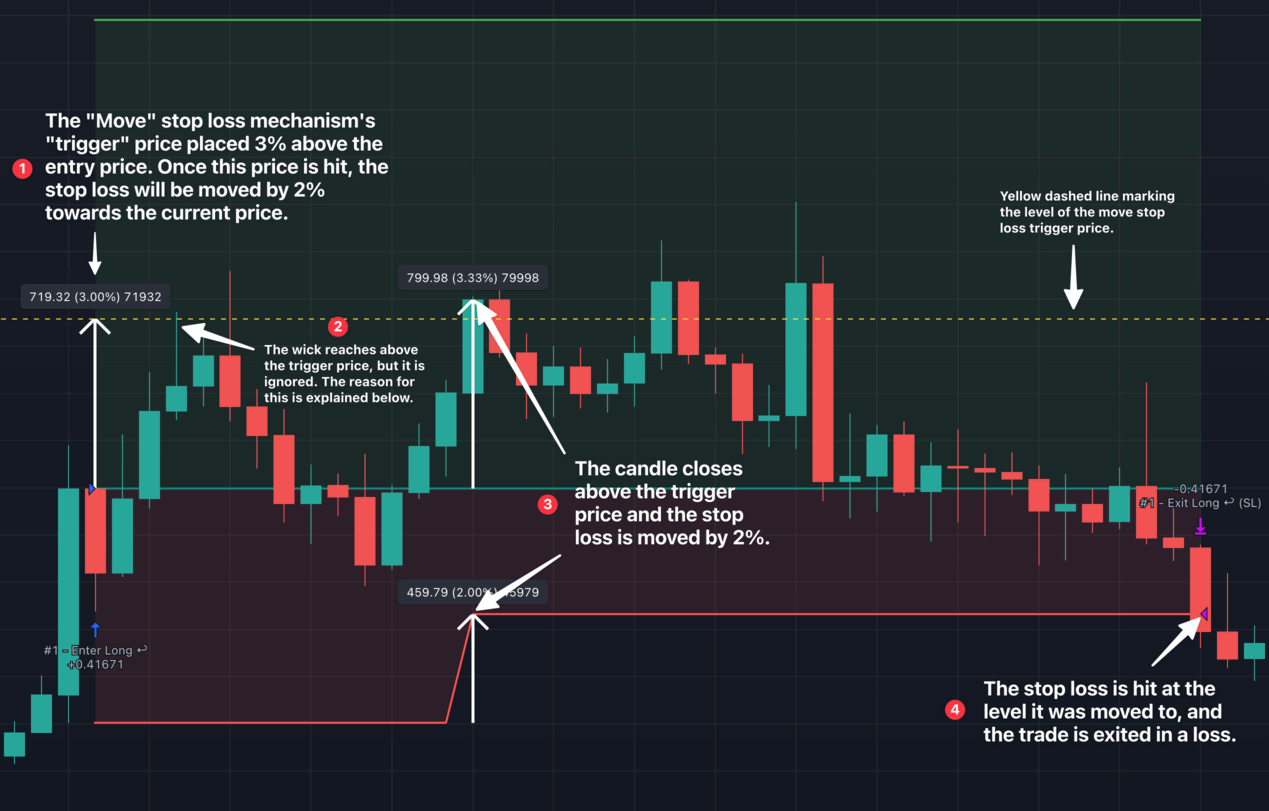
As you can see at point (2) the stop loss was not moved, even though the candle's high reached above the trigger price. Why is that?
It is because of Use Candle Wicks is set to No:

If you were to change Use Candle Wicks to Yes, the stop loss would have been moved as soon as the wick went past the trigger price:
The way Use Candle Wicks works gets a bit more complicated when it is used in combination with the Trail mechanism, but we will get to that later.
Now that we understand how the Move dynamic stop loss mechanism works, let's take a look at the Trail mechanism.
Mode: Trail
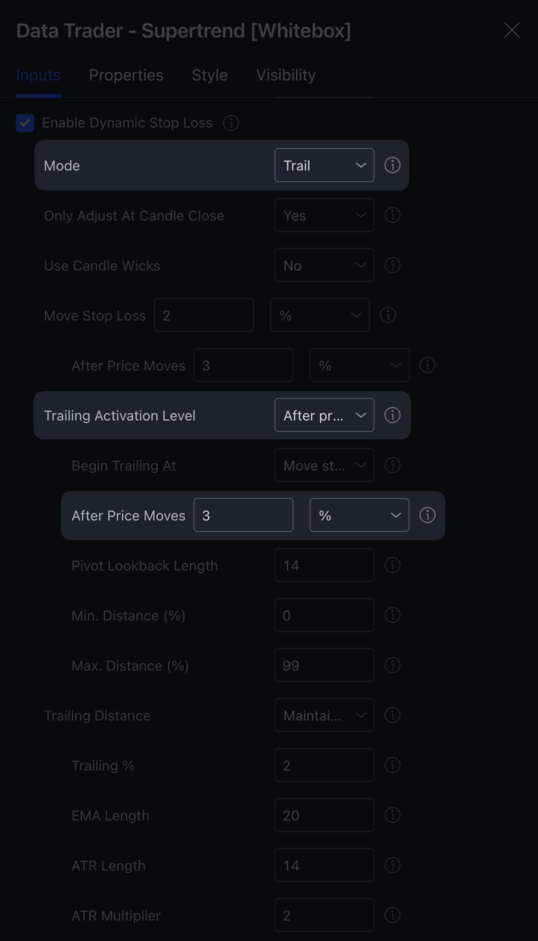
The trailing stop loss mechanism is slightly more advanced as can be seen from the number of relevant settings:
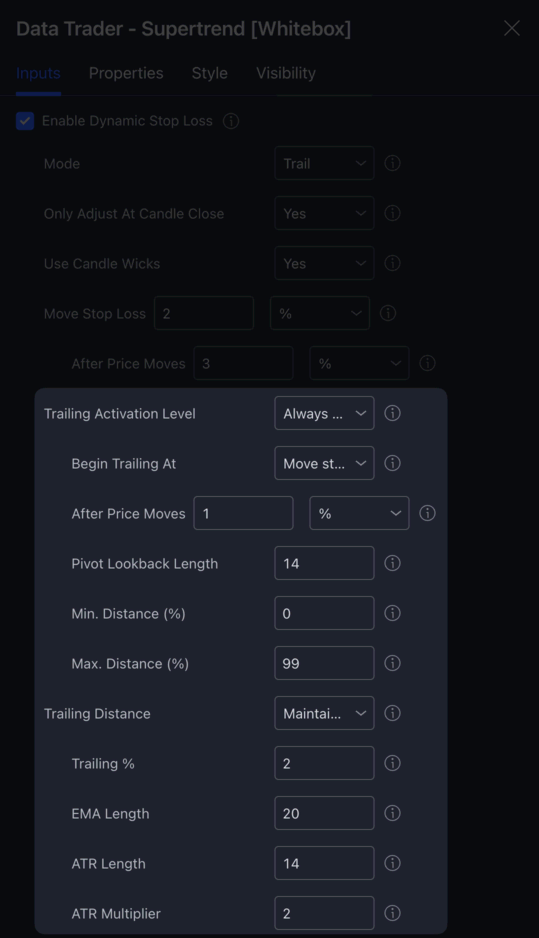
Only those inputs that are highlighted affect the trailing mechanism. Again, this is not entirely true as the Only Adjust At Candle Close and the Use Candle Wicks settings also play a role in how trailing behaves, but we will get to that later.
Let's go through each relevant options one by one.
Trailing Activation Level
The "trailing activation level" is the price level at which the trailing mechanism will be activated.
It can be set to one of the following:
Always active: Trailing will be activated from the moment of opening the position.After moving stop loss: Trailing will be activated once the stop loss was moved by the "moving" mechanism.After price moves: Trailing will be activated once the price moves towards the take profit by the amount you specify below.After previous pivot's level is reached: Trailing will be activated once the pivot high / low that happened before the pullback candle is reached.
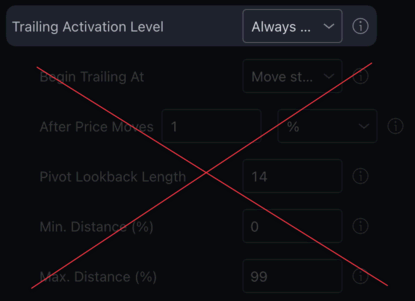
Trailing Activation Level - Always active
When the Trailing Activation Level is set to Always active, the trailing mechanism will be activated from the moment of entering the position. In other words the price does not have to reach any pre-set level for the trailing to become active. Once the entry is made, as soon as the price starts climbing towards the take profit, the trailing mechanism will immediately start moving the stop loss.
Because trailing is always active, non of the settings underneath the Trailing Activation Level dropdown play a role in configuring the trailing activation mechanism:
Trailing Activation Level - After moving stop loss
When the Trailing Activation Level is set to After moving stop loss, the trailing mechanism will be activated after the moving mechanism has moved the stop loss. This only works when Mode is set to Move & Trail, something we will discuss later.
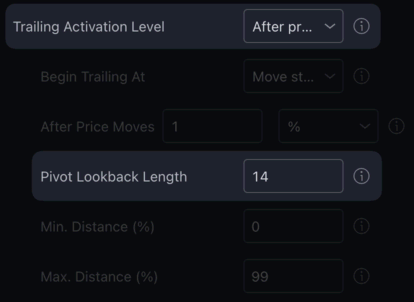
Trailing Activation Level - After price moves
When the Trailing Activation Level is set to After price moves, the trailing mechanism will be activated after the price has moved towards the take profit by the amount you specify below in After Price Moves:
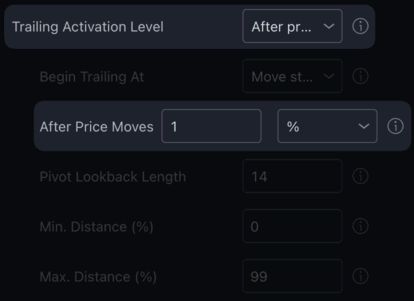
In the example above, the trailing mechanism would become active once the price has moved 1% towards the take profit.
Trailing Activation Level - After previous pivot's level is reached
When the Trailing Activation Level is set to After previous pivot's level is reached, the trailing mechanism will be activated after the price reaches the previous pivot's price level.
How the pivot is determined can be configured via the Pivot Lookback Length input below:
A "pivot" is either the high or the low of the candle, which does not have neighbouring candles that would reach higher or lower.
The value in Pivot Lookback Length determines how many past candles the script will look at when determining which was the last pivot candle.
Trail mechanism example
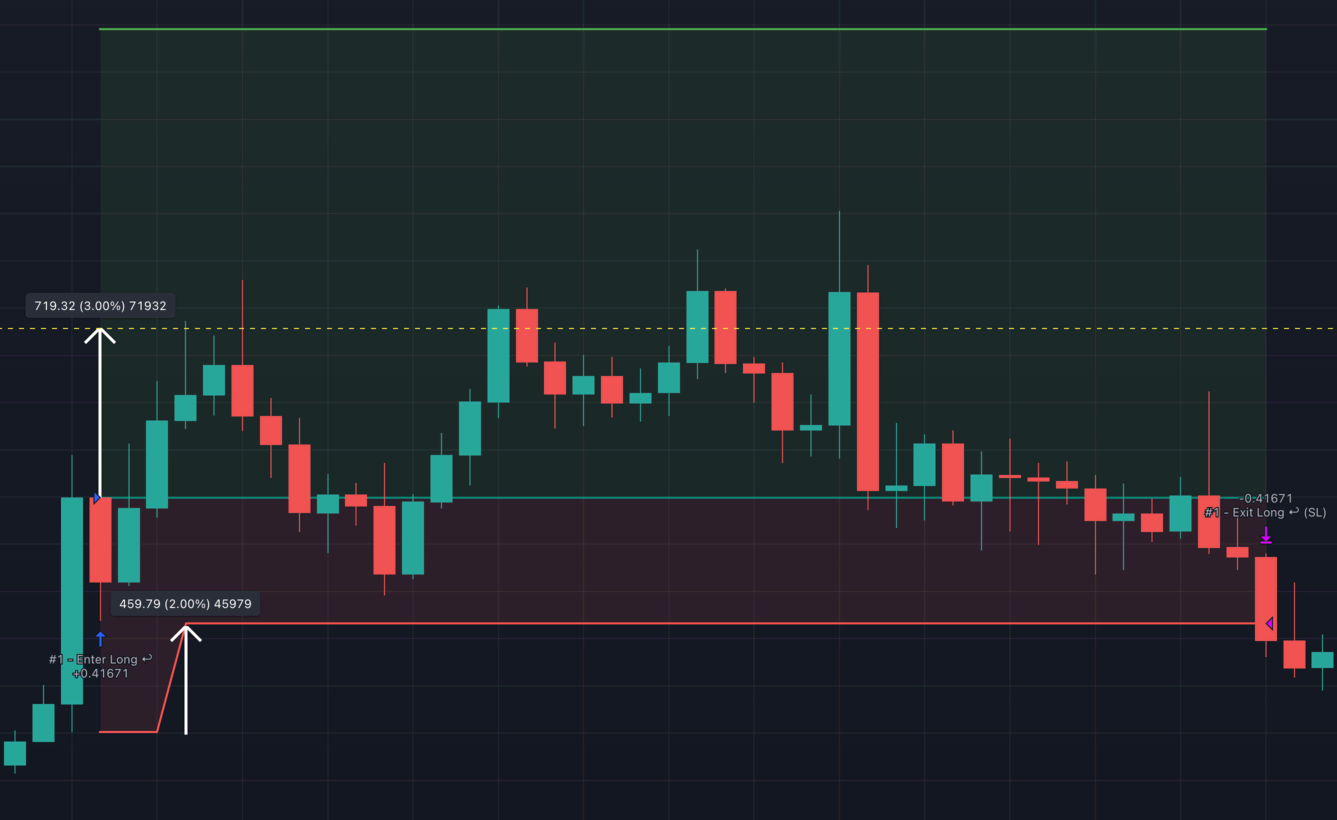
Let's have a look at an example trade and how the trail mechanism works in practice.
We will be using these settings:
- Mode: Trail
- Trailing Activation Level: After price moves
- After Price Moves: 3%
With these settings we should see the trailing mechanism kick into action after the price moves 3%.

How far the trailing mechanism trails the price at depends on how you set up the "Trailing Distance". We will learn about this section shortly.
Mode: Move & Trail
When Mode is set to Move & Trail, the stop loss will be changed by both the moving and the trailing mechanisms. This generally means that the stop loss is first moved by the moving mechanism, and right after that the trailing mechanism kicks into action.
Begin Trailing At
The price level at which the strategy will continue trailing the price from. Only used when you have the mode set to Move & Trail, and the trailing activation mechanism set to After moving stop loss. It is also assumed that Only adjust on candle close is enabled.
Move stop loss mechanism's trigger price: Start trailing at the price level where theMovestop loss mechanism was triggered at.Candle close price: Start trailing at the closing price of the candle that triggered theMovestop loss mechanism.
Here is an example to explain the difference between the two:
You have dynamic stop loss enabled with mode set to Move & Trail. Trailing activation is set to After moving stop loss. You want to have the stop loss moved to break even once the price reaches one times the risk.
You are in a long position; your entry price is $100, your stop loss is $90, and the 'move stop loss' mechanism's trigger price is $110.
A few candles into the trade, a candle opens at $105 and closes at $130. On candle close, the strategy sees that the move stop loss mechanism's trigger price has been hit, so it moves the stop loss to $100 (break-even). It also knows that it needs to activate the trailing mechanism once the stop loss is moved.
What price should the strategy use as the starting point of the trailing mechanism? $110 (the move mechanism's trigger price) or $130 (the candle's close price)?
With Move stop loss mechanism's trigger price selected, the trailing will start at $110. This means that once the strategy moves the stop loss to $100, the trailing mechanism will immediately move the stop loss to $120 and continue to trail the price at a $10 distance. Why did it move the stop loss to $120? Because when the candle closed, the price was already $20 above the move mechanism's trigger level. You told the strategy you wanted to trail the price from the trigger level, so it did just that. Note that if you had the 'Stop Loss Moved' alert enabled, this would have resulted in 2 alerts being sent to you in quick succession.
With Candle close price selected, the trailing will start at $130. After the 'move stop loss' mechanism moves the stop loss to $100, the trailing mechanism won't do anything (yet). It doesn't need to move the stop loss anywhere, as it was told to start trailing the price at $130 (the candle's closing price). The price would have to continue to move more towards profit for the trailing to begin. If the next candle closes at $140 for example, there is now a $10 difference between the 'trail from' price and the current price. This will prompt the trailing mechanism to move the stop loss to $110 to maintain the $30 difference between the price and the stop loss.
Min. Distance (%)
The minimum distance (in %) that is required between the entry price and the trailing trigger price. For example when opening a long position, if the pivot based trigger activation method would place the trigger activation line 0.1% above the entry price, having this set to 2 would ensure that the trigger activation line is placed 2% above the entry price.
Max. Distance (%)
The maximum distance (in %) that can be between the entry price and the trailing trigger price. For example when opening a long position, if the pivot based trigger activation method would place the trigger activation line 10% above the entry price, having this set to 5 would ensure that the trigger activation line is placed only 5% above the entry price.
Trailing Distance
The distance at which the trailing stop loss should follow the price.
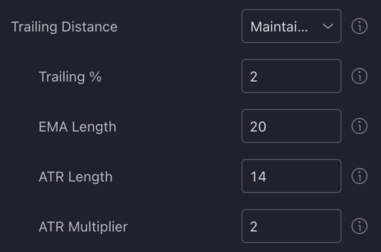
Available options:
Maintain distance: Once the trailing stop loss is activated, the distance between the stop loss and the trigger price will be recorded, and this distance will be maintained between the price and the stop loss throughout the position.Trail at %: Once the trailing stop loss is activated, the stop loss will follow the price at the specified % distance.Trail EMA: Once the trailing stop loss is activated, the stop loss will follow the EMA you configure below.Trail ATR: Once the trailing stop loss is activated, the stop loss will follow the ATR you configure below.
Only Adjust At Candle Close
When a strategy script is executed on historic candles, the script has only a single chance to adjust the stop loss, and that is when the candle closes.
When a strategy is being executed on realtime candles, the script has a chance to adjust the stop loss on every tick, not just at candle close. This allows the script to adjust the stop loss multiple times on each candle. This means that if you are looking at a chart on a higher timeframe, the script may get executed hundreds of times on each realtime candle. With each of these executions, the strategy has a chance to update the stop loss, even before a candle is closed.
While you may look at this as an advantage (not having to wait for a candle to close before checking if the move/trail mechanisms trigger price has been hit) this will ultimately result in repainting behaviour, as the strategy won't have a chance to adjust the stop loss before a candle closes when it is running a backtest.
If you would like to ensure that the strategy is behaving the same both during a backtest and a forward-test (i.e. when run on realtime candles) set Only Adjust At Candle Close to Yes.
When set to 'Yes', the strategy will only adjust the stop loss once per candle close.
Use Candle Wicks
If set to Yes, the strategy will use the candle wicks (high for longs, low for shorts) instead of the closing price of the candle when determining whether the move / trail mechanisms' trigger prices have been hit, and also to determine how much it should adjust the stop loss by (applies to trailing only, see next paragraph).
If enabled, and used in conjunction with Maintain distance or Trail ATR trailing mechanisms, the strategy will use the wicks of the candles for calculating the distance travelled, or to add / subtract the ATR values to / from.
Example Scenario 1: Use Candle Wicks is set to No, in a long position, the 'trailing stop loss' trigger price is $1000, the candle closed, the high of the candle is $1100 and the close is $950. The trailing mechanism will not activate, as the closing price of the candle did not go past the trigger price.
Example Scenario 2: Use Candle Wicks is set to Yes, in a short position, the 'move stop loss' trigger price is $1000, the candle closed, the low of the candle is $900 and the close is $1050. The trailing mechanism will activate this time, as the low of the candle went past the trigger price.
Take Profit Strategy
Now that we know the ins and outs of configuring the stop loss, let's move onto the take profit settings.
By configuring a "Take Profit Strategy" you can tell the script how to calculate the take profit for each position it opens.
You can choose from the following strategies:
- Risk multiplier: The take profit will be set to X times the risk.
- ATR based: The take profit will be set to X times the ATR above/below the entry signal candle's closing price.
- MA(ATR) based: The take profit will be set to X times the MA smoothed ATR above/below the entry signal candle's closing price.
- % based: The take profit will be set to X percent above/below the entry signal candle's closing price.
- Tick based: The take profit will be set to X ticks above/below the entry signal candle's closing price.
- Disabled: The strategy will not use a take profit.
The strategies listed above are available in every strategy script. Some of the scripts have other, script specific take profit strategies. These custom strategies are documented under the dedicated help page of each strategy script.
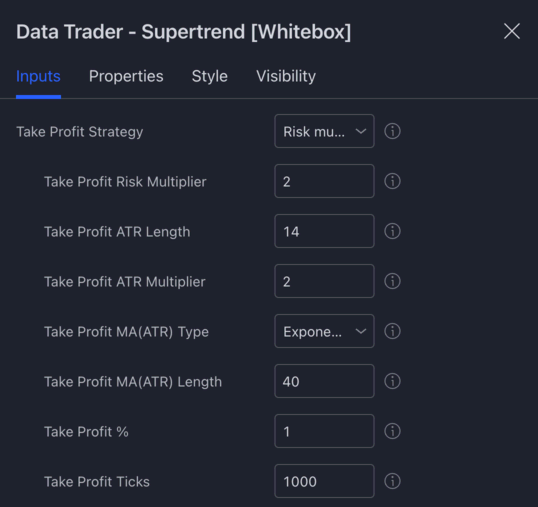
Risk multiplier
The risk multiplier take profit strategy will have the take profit set to a certain factor of the risk (the difference between the entry price and the stop loss).
For example for a long trade if the entry price is $1000 and the stop loss is $900, the risk is $100. Using a risk multiplier of 2, will have the take profit set to 2 * $100 = $200 above the entry price at $1200.
ATR based
When using the ATR based take profit strategy, the take profit will be placed X times the ATR above or below the entry price. The ATR itself can be configured via the Take Profit ATR Length and Take Profit ATR Multiplier inputs.
MA(ATR) based
The MA(ATR) based take profit strategy is very similar to the ATR based, the only difference is that the ATR value itself is smoothed using a moving average.
The type and length of the moving average to be used for smoothing the ATR can be configured via the Stop Loss MA(ATR) Type and Stop Loss MA(ATR) Length inputs.
The ATR itself can be configured via the Take Profit ATR inputs, as described above.
% based
The percentage based take profit strategy is as simple as it sounds. Each trade's take profit will be placed X percent below or above the entry signal candle's closing price.
The % can be configured via the Take Profit % input:
Tick based
The tick based take profit strategy will place the take profit X ticks above or below the entry signal candle's closing price. The number of ticks to use can be configured via the Take Profit Ticks input.
Each market has its own specific tick value associated with it. For example on the BTCUSDT 1 tick is equal to 0.01 USDT.
Using a Take Profit Ticks value of 500, will have each trade's take profit placed 500 * 0.01 = 5 USDT above (for longs) or below (for shorts) the entry price.
Disabled
Finally, if you have the take profit strategy set to disabled, no take profit will be used for any of the trades.
If no take profit is being used, how do trades get exited then?
- Stop loss is hit
- "Close position early..." condition becomes active (see below)
Secondary Take Profit Strategy
By configuring a secondary take profit strategy, you have the option to override the primary take profit if it meets a specific criteria.
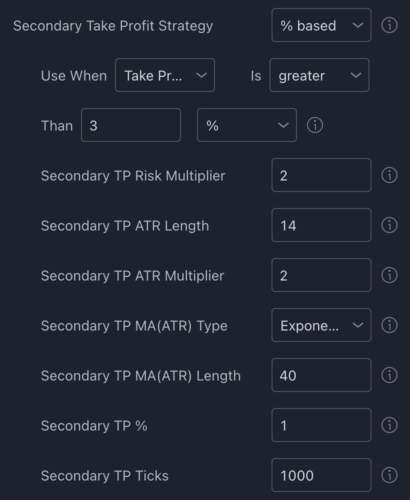
For example, assume you use an ATR based strategy with a multiplier set to 3 as your primary take profit strategy. Most of the time the take profit will be placed relatively close to the entry price. However, there will be times, when the ATR based take profit is placed too far from the entry price. In this case, you may want to opt to use a % based take profit strategy instead. To do this, set the secondary take profit strategy to % based, and configure the criteria when the secondary strategy should take over. Whenever the activation criteria is true, the secondary take profit strategy will take over for that particular trade.
The parameters for the secondary take profit strategy (e.g. what % to use) can be set in the dedicated inputs underneath the secondary take profit strategy dropdown.
Minimum Take Profit %
You can use this as a safety net to prevent take profits being placed too close to the entry price. Setting this to 2 for example would result in the strategy never placing the take profit closer than 2% to the entry price. This setting applies to both the primary and secondary take profit strategies.

Maximum Take Profit %
You can use this as a safety net to prevent the take profit being placed way too far away from the entry price. Setting this to 10 for example would result in the strategy never placing the take profit further than 10% away from the entry price. This setting applies to both the primary and secondary take profit strategies.

Close position early
Normally, a trade is only ever closed if either the take profit or the stop loss is hit. However, you have the option to activate certain conditions, which if met during a trade, a position gets closed automatically.
There are some conditions that are built into every strategy, such as Close position after X minutes, however there are others that are strategy specific.
Let's review the early position closure conditions of the Data Trader - Supertrend strategy script:
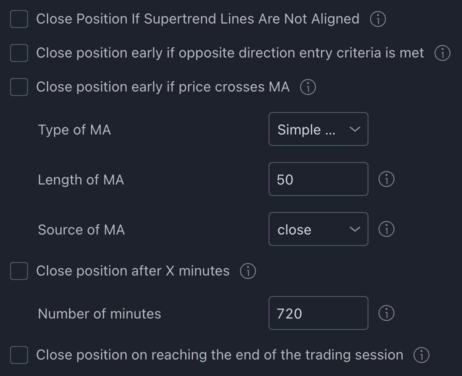
Close position if supertrend lines are not aligned
This condition is specific to the Data Trader - Supertrend strategy script. If you activate it, a trade will be closed as soon as the 3 Supertrend lines are not aligned (i.e. not all Supertrend lines are the same colour).
Close position early if opposite direction entry criteria is met
If enabled, the strategy will close the active position if the opposite direction entry criteria is met. In other words, if the strategy is in a long positionand the short entry criteria is met, the long position will be closed.
Close position early if price crosses MA
If enabled, the strategy will close an open position as soon as the price crosses the specified Moving Average.
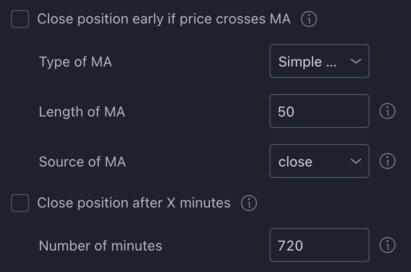
Long positions will be closed if the price crosses below the MA. Short positions will be closed if the price crosses above the MA. The condition is only evaluated at bar close.
Close position after X minutes
If enabled, the strategy will close an open position if it has been open for longer than the specified number of minutes. 720 minutes is 12 hours, 1440 minutes is 1 day, etc.
Note: this condition is only evaluated at bar close. So for example, if you are looking at a 1 hour chart, and you set the number of minutes to 10, the position will only be closed 50 minutes after the position being open for 10 minutes (at bar close).
Close position on reaching the end of the trading session
If enabled, the strategy will close the position on reaching the end of the configured trading session.
Note: You must enable 'Restrict Entries To Days And Time Range' for this check to work. Also note that the condition is only evaluated at bar close, so if your trading session ends in the middle of a bar, the strategy will close your position later than you might expect.