Whitebox Strategy Engine » DCA Settings
Overview
Enabling DCA (Dollar Cost Averaging) will make the strategy place additional buy or sell (safety) orders below or above the entry price (depending on the trade's direction).
Once these additional orders fill, the average entry price of the overall trade will come closer to the current price, giving you a better chance to close the trade in a profit, even if the asset's price never recovers to the level when it was at entry.
The DCA configuration options below mimic the settings of 3Commas' DCA bots. The only difference, is that the strategy will always place all the safety orders on entry, meaning there is no way to configure the Max *active* safety trades count only the Max safety trades count.
To learn more about DCA, search for "dollar cost averaging" on the internet.
Settings
The scripts exposes a few options to allow you freely customise the DCA behaviour:
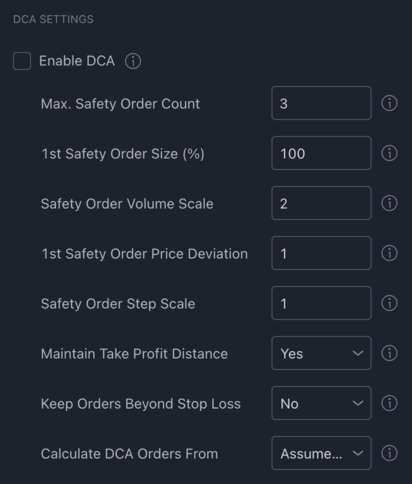
Let's review these options one by one.
Max. Safety Order Count
The number of safety orders the strategy should submit in addition to the entry order.
Note: The more safety orders you use, the more money is going to be "locked" into each trade.
1st Safety Order Size (%)
The size of the 1st safety trade's position expressed as a % of the initial entry order. For example, setting this to 100% will result in the 1st safety trade to use the same position size as the entry order. 200% would use double the size of the entry order, etc. Each additional safety trade will scale it's position size based on the value set in the Safety Order Volume Scale config (see below).
Safety Order Volume Scale
The scale at which to increase each safety order's size.
For example with the Safety Order Size set to 100% and the Safety Order Volume Scale set to 2, the strategy will place the following safety orders:
- Safety Order #1 with position size equal to the initial order size (as configured in Safety Order Size)
- Safety Order #2 with position size double the size of Safety Order #1
- Safety Order #3 with position size double the size of Safety Order #2
etc.
1st Safety Order Price Deviation
The percentage difference in price to place the first safety order at.
For example, if you set this to 3%, the 1st safety order will be placed 3% below (for long entries) or 3% above (for short entries) the entry price. Each subsequent safety orders (2nd, 3rd, etc.) will be placed below or above the 1st safety order. How far they are spaced out depends on the value set in Safety Order Step Scale (see below).
Safety Order Step Scale
The scale at which the safety trades should be spread out.
For example, if you set this to 1, the strategy will submit the following safety orders for a long position:
- Safety Order #1 placed 3% below the entry price (as configured in
Price Deviation To Open Safety Orders) - Safety Order #2 placed 3% below Safety Order #1 (6% below entry price)
- Safety Order #3 placed 3% below Safety Order #2 (9% below entry price)
If you were to use a scale of 2, the orders would be the following:
- Safety Order #1 placed 3% below the entry price
- Safety Order #2 placed 6% (2 x 3%) below Safety Order #1 (9% below entry price)
- Safety Order #3 placed 12% (2 x 6%) below Safety Order #2 (21% below entry price)
etc.
Maintain Take Profit Distance
If set to yes, the strategy will automatically move the take profit towards the avg. entry price whenever a safety order is filled.
If disabled, the take profit will be static throughout the entire trade.
Keep Orders Beyond Stop Loss
If set to no, the strategy won't submit any safety orders that would go beyond the stop loss. If a dynamic stop loss is used, every time the stop loss is moved the strategy will assess if there are any safety orders that are now beyond the stop loss as a result of the move. If it finds any unfilled safety orders beyond the stop loss, it will cancel those automatically.